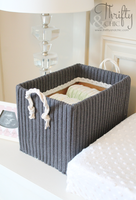
DIY: Storage Boxes From Old Sweaters
May 12, 2015
May 12, 2015
Need some inspiration for updating your organization in your home? I love collecting containers, boxes of all sizes to store/hide my clutter and what not.
After discovering this great (and cheap) DIY tutorial, I’m so excited to upcycle some old jumpers and gain some super cute storage boxes!
1. Start off by cutting off the top flaps of the boxes with a knife/razor blade.
2. Put the box into the sweater and mark where you want to cut it. The cut mark was roughly 2 inches or more than the box. This left enough room for the sweater to fold over into the box.
3. Laid out the sweater and cut it as straight as possible.

4. Since the bottom of the sweater is hemmed, the fabric was put at the bottom of the box since you'll see it, and since it's straight. Secured the sweater all around the box with some hot glue. If the sweater is too tight, you can stretch it. If it's too big for the box, you'll have to do an extra step and cut off some excess fabric.
5. Once the bottom was glued on, fold the sweater over into the box and secured it with some glue.
6. You can finish the raw edge off with some cute ribbon. This is optional. Hot glued the ribbon all along the edge on the inside of the box.

7. For the handles, it's not necessarily the most functional since you can't really use the handles if you have a ton of weight in the box...but it still made it look cute. This tutorial used some rope and twirled it around and then knotted it on both ends. Just hot glue it directly onto the sweater fabric.

Done!
Original tutorial found over here :)